Image to Lithophane Maker — Turn Photos into Backlit 3D Art
A lithophane is a thin 3D-printed object that reveals an image when light shines through it. Thinner sections appear brighter, thicker sections appear darker — creating stunning, detailed images from your photos. Choose flat, curved, or dome shapes for lamps, night lights, and window displays.
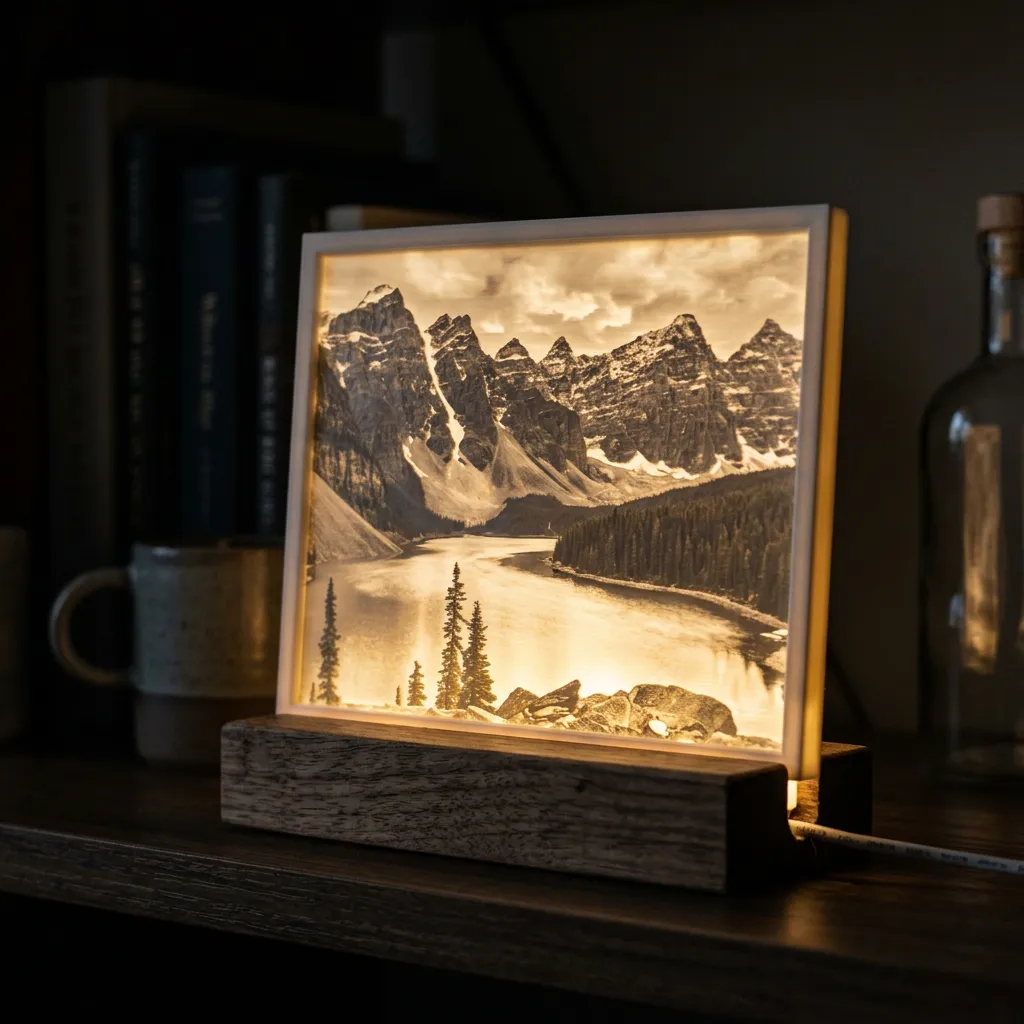
How Lithophanes Work
Flat Lithophanes
Best for hanging on windows, inserting in light boxes, or displaying in picture frames with LED backlighting. Simple and versatile.
Curved Lithophanes
Wraps around cylindrical lamps or curved lamp shades for 360-degree viewing. Perfect for table lamps and pendant lights.
Dome Lithophanes
Hemispherical dome shape ideal for night lights, ceiling fixtures, or spherical lamps. Creates an immersive viewing experience.
The key principle: light passes through thin areas easily (bright in the final image) and is blocked by thick areas (dark in the image). Our algorithm precisely maps your photo's brightness values to varying material thickness, creating a perfect inverse of your image that reveals itself when illuminated.
Lithophane Printing Guide
Use White or Natural PLA
White PLA transmits light best for lithophanes. Avoid dark, transparent, or translucent filaments which reduce contrast and image clarity.
Print at 100% Infill
Any gaps in infill create visible artifacts when backlit. Solid 100% infill produces the cleanest, most detailed image.
Print Vertically (On Edge)
Orienting the lithophane vertically produces the smoothest surface finish and best detail. Add a brim for stability.
Use Thin Layer Height
0.12mm or smaller layer height captures more detail. Each additional layer adds image resolution when viewed from the side.
Choose Photos with Good Contrast
High-contrast photos with clear detail translate best. Soft gradient images produce subtle lithophanes that need bright backlighting to see clearly.
The Complete Lithophane Lighting System Guide
LED Strip vs Single Bulb vs Natural Light
LED strip (recommended): Provides uniform backlighting across the entire lithophane. No hot spots. Place 5-15cm behind the panel. Density: 60 LEDs/meter minimum. A 30cm lithophane needs at least 18 LEDs behind it for even coverage. Single LED bulb: Creates a bright hot spot in the center that fades toward the edges. Works for small lithophanes (under 10cm) but larger panels will have visible brightness falloff. Natural window light: Works beautifully during the day but is invisible at night. Position the lithophane facing the window. The changing light throughout the day creates a dynamic effect — the image looks different at dawn, noon, and dusk.
Color Temperature Effects
Warm white (2700-3000K): Soft, natural, flattering. Best for portraits and sentimental photos. Creates a cozy, antique feel. Slightly reduces perceived contrast. Neutral white (4000-4500K): Balanced, accurate. Best for landscapes and detailed images. Shows the most detail. Cool white (6000-6500K): Clinical, high-contrast. Shows maximum detail but can feel harsh. Best for architectural or technical lithophanes. RGB LEDs: Experiment with colors. A blue backlight creates a moonlight effect. Red/orange creates a warm fireplace glow. Green enhances nature photos. Programmable RGB strips let you change the mood on demand.
Light-to-Panel Distance
The distance between the light source and the lithophane panel is critical. Too close (<3cm): The light source is visible as bright spots. Individual LEDs are distinguishable. Optimal (5-15cm): Light diffuses evenly. The image is clear and uniform. Too far (>20cm): Light is weak and the image appears dim. The panel needs a brighter light source. Rule of thumb: distance should be approximately 1x the panel's shortest dimension. A 15cm × 20cm panel works best with the light 15cm behind it. Add a diffuser (white acrylic sheet or tracing paper) between the LEDs and the lithophane for the smoothest lighting.
Lithophane Thickness: The Critical Parameter
The minimum and maximum thickness of a lithophane determine how much light passes through and how detailed the image appears.
Minimum Thickness (Brightest Areas)
The thinnest part of the lithophane corresponds to the brightest parts of your image. 0.6-0.8mm: Very bright, almost transparent. These areas may be fragile. Good for images with large bright areas (sky, white backgrounds). 0.8-1.2mm: Standard minimum. Bright enough for good light transmission while maintaining structural integrity. This is the default in our tool. 1.2-1.5mm: Conservative minimum. The image will appear slightly darker overall. Recommended for lithophanes that will be handled frequently (desk lamps, portable lights).
Maximum Thickness (Darkest Areas)
2.5-3.0mm: Dark but still transmits some light. Good contrast with 0.8mm minimum. 3.0-4.0mm: Very dark. Creates dramatic contrast. May appear nearly black if the backlight is not bright enough. 4.0mm+: Essentially opaque with standard LEDs. Only use if you have a very bright light source. Thickness range = max - min: A range of 2-3mm produces good contrast. A range under 1.5mm produces a washed-out, low-contrast lithophane. A range over 4mm may have areas that are completely opaque.
Print Time vs Quality Trade-off
Layer height affects both print time and image quality. 0.20mm: Fast (2-3 hours for a 10cm panel). Visible layer lines when backlit. 0.12mm: Balanced (4-6 hours). Layer lines are subtle. This is the recommended default. 0.08mm: High quality (8-12 hours). Layer lines nearly invisible. Only worth it for large panels viewed up close. 0.04mm: Maximum quality (16-24 hours). Requires a well-calibrated printer. Overkill for most purposes; the improvement over 0.08mm is barely visible.
Multi-Panel and Large Lithophanes
Splitting Large Images Across Multiple Panels
For images larger than your printer bed: 1. Split your image into grid sections in a photo editor (e.g., 2x2 for a 20cm image on a 10cm printer). 2. Convert each section as a separate lithophane with identical settings. 3. Print all panels and assemble them edge-to-edge in a frame. 4. Use a diffuser behind the entire assembly to hide the seams. Tip: overlap panels by 2-3mm at the seams to prevent light leakage. The seam will be visible up close but invisible from normal viewing distance.
Curved Panoramic Lithophanes
Use the curved lithophane mode to create 360-degree panoramic displays. For a complete cylinder: split a panoramic photo into 4 equal sections, convert each as a 90-degree curved panel, print, and assemble. Place a single LED bulb in the center for uniform lighting in all directions. This creates a rotating display where the viewer walks around to see the full image. The curved geometry naturally diffuses the central light.
Lithophane FAQ
- What is a lithophane and how does it work?
- A lithophane is a thin etched or molded artwork that reveals an image when backlit. In 3D printing, varying thickness controls light transmission: thin = bright, thick = dark. The result is a detailed monochrome image visible only when illuminated from behind.
- What filament is best for lithophanes?
- White PLA is the gold standard. It transmits light evenly and produces the clearest images. Natural PLA also works well. Avoid dark colors, transparent, silk, or glitter filaments which scatter or block light.
- Why should I print lithophanes vertically?
- Vertical orientation (on the narrow edge) aligns layers parallel to the image plane. This creates smoother surfaces and better light transmission since light passes through layers rather than across them.
- What photos work best for lithophanes?
- Photos with strong contrast and clear subjects. Portraits, landscapes with distinct features, and images with a good tonal range produce the most striking results. Avoid very dark or washed-out photos.
- What lighting works best for displaying lithophanes?
- LED strips or bulbs placed 5-15cm behind the lithophane produce the best results. Warm white (2700-3000K) gives a soft, natural look. Cool white (5000-6500K) shows more detail but can feel harsh. Avoid point-source lights that create hot spots.
- Can I paint or color a lithophane?
- Painting blocks light and ruins the lithophane effect. Instead, add color by placing a colored transparent film behind the lithophane, using colored LEDs, or printing with a colored translucent filament. You can also paint the frame while leaving the lithophane panel unpainted.
Create Your Lithophane Now
Upload a photo above and create a beautiful 3D printed lithophane. Free, instant, no registration.